
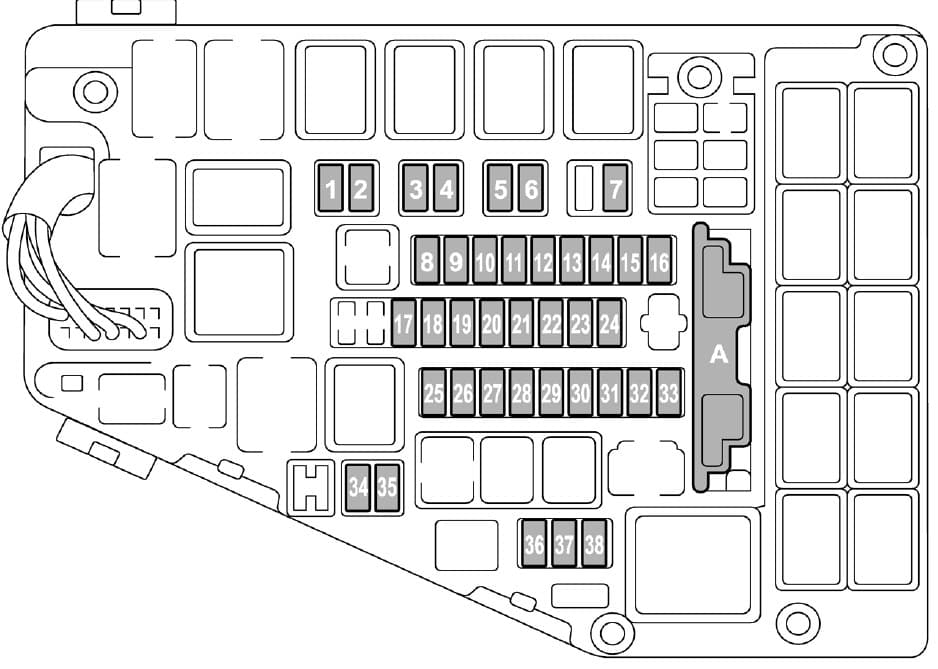


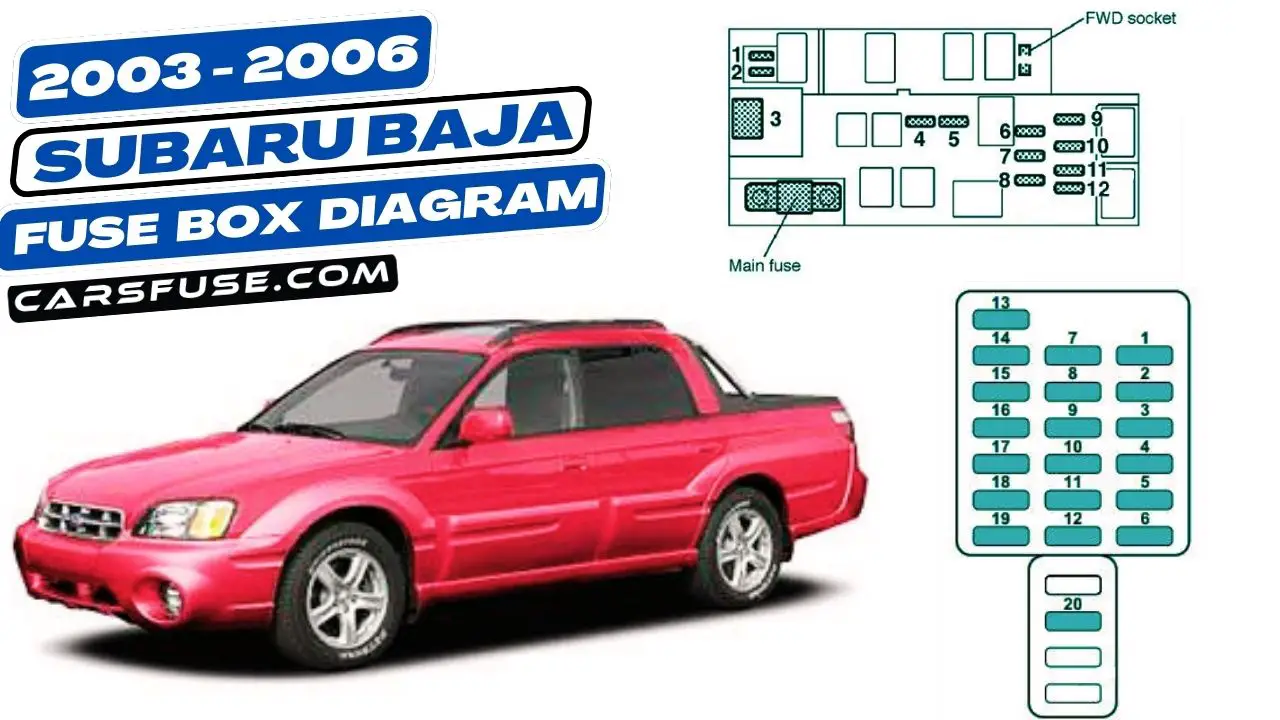
html Lost Power in Your '96 Subaru? Fuse Diagram Guide Lost Power in Your '96 Subaru? The ULTIMATE 1996 Subaru Fuse Diagram Guide (Avoid the Mechanic!) Owning a classic 1996 Subaru can be a rewarding experience, but electrical gremlins are a common challenge. From a dead radio to non-functioning headlights, a blown fuse is often the culprit. This guide is designed to help you understand your 1996 Subaru's fuse box, diagnose electrical problems, and hopefully, avoid costly trips to the mechanic. We'll cover fuse locations, what each fuse controls, and how to safely replace a blown fuse. Get ready to become your own Subaru electrical expert! Understanding Your 1996 Subaru's Fuse Boxes Your 1996 Subaru typically has two main fuse boxes: one located under the hood (engine compartment) and another inside the cabin, usually near the driver's side dashboard or under the steering wheel. Knowing the location of each is crucial for quick and effective troubleshooting. The exact placement can vary slightly depending on the model (e.g., Legacy, Outback, Impreza), so always consult your owner's manual for the precise location for *your* specific vehicle. [Link to Subaru owner's manual download site - example: Subaru's official website or a reputable third-party manual provider like ManualsLib.com]. Fuse Box Components and Terminology Before diving into the diagrams, let's clarify some key terms: Fuses: These are safety devices designed to protect your car's electrical circuits from overcurrent. They are typically small, rectangular or blade-shaped plastic housings with a thin wire inside. When the current exceeds the fuse's rating, the wire melts, breaking the circuit and preventing damage to the connected components. Fuse Amperage: This indicates the maximum current the fuse can handle before blowing. It's usually printed on the fuse itself (e.g., 10A, 15A, 20A). Fuse Box Cover: This protective cover often contains a diagram or a legend detailing the function of each fuse. However, these can sometimes be inaccurate or missing, hence the need for this guide! Fuse Puller: A small plastic tool, often found inside the fuse box cover or a nearby compartment, designed to safely remove fuses. Using a tool prevents damage to the fuse box. 1996 Subaru Fuse Diagram: Engine Compartment (Under-Hood) This fuse box usually houses the fuses that protect critical engine and related components. Remember to consult your owner's manual for the *exact* fuse layout for your model, as variations exist. This general guide provides a good starting point: Common Fuses and Their Functions (Example - Remember to verify in your manual): Main Fuse (High Amperage): Protects the entire electrical system. Often a large, rectangular fuse. Failure here often means no power to anything. (e.g., 80A, 100A, etc.) ABS (Anti-lock Braking System): Powers the ABS control module. (e.g., 20A) Engine Control Module (ECM/ECU): Powers the engine’s computer. (e.g., 15A) Fuel Pump: Powers the fuel pump. (e.g., 15A) Radiator Fan: Controls the cooling fan. (e.g., 20A) Headlights (High/Low Beam): Often separate fuses for high and low beams. (e.g., 10A, 15A) Horn: Powers the horn. (e.g., 10A) Important Note: Always disconnect the negative battery terminal before working on any electrical components. This minimizes the risk of short circuits and electrical shocks. [Link to a reputable source on car battery safety - example: a safety guide from AAA or similar organization]. 1996 Subaru Fuse Diagram: Interior (Cabin) The interior fuse box protects components inside the cabin, such as the radio, interior lights, power windows, and more. Again, consult your owner's manual for the precise layout. Here's a general overview: Common Fuses and Their Functions (Example - Verify with your manual): Cigarette Lighter/Power Outlet: Powers the cigarette lighter and any accessory devices plugged into it. (e.g., 15A) Radio: Powers the car stereo. (e.g., 10A, 15A) Interior Lights: Controls the dome light and other interior lights. (e.g., 10A) Power Windows: Powers the power window motors. (e.g., 20A) Wipers: Controls the windshield wipers. (e.g., 15A) Turn Signals/Hazard Lights: Controls the turn signals and hazard lights. (e.g., 10A) Instrument Cluster: Powers the gauges and warning lights. (e.g., 10A) Diagnosing and Replacing a Blown Fuse Here's a step-by-step guide to diagnosing and replacing a blown fuse: Identify the Problem: What electrical component isn't working? (e.g., radio, headlights, etc.) Consult the Diagrams: Locate the fuse box and refer to your owner's manual or this guide to identify the fuse that controls the faulty component. Visual Inspection: Open the fuse box and visually inspect the fuses. Look for a broken wire inside the fuse. A blown fuse will often have a darkened or melted appearance. Use a Multimeter (Optional but Recommended): If you're unsure, use a multimeter to test the fuse for continuity. Set the multimeter to the continuity setting (often indicated by a speaker icon). Place the probes on each end of the fuse. If the multimeter beeps or shows a reading, the fuse is good. If not, it's blown. [Link to a multimeter tutorial - example: a video tutorial on YouTube or a detailed guide from a reputable electronics website.] Replace the Fuse: Using the fuse puller (or carefully with needle-nose pliers), remove the blown fuse. Install a new fuse with the *same amperage rating*. *Never* use a fuse with a higher amperage rating, as this could damage the circuit and potentially cause a fire. Test the Component: Turn on the electrical component to see if it's working. If the Fuse Blows Again: If the new fuse blows immediately, there's likely a short circuit in the wiring. This may require further diagnosis by a qualified mechanic. Common Problems and Solutions Here are some common electrical problems and the fuses you might check: No Headlights: Check the headlight fuses (engine compartment). Also, check the headlight relay. Radio Not Working: Check the radio fuse (interior). Power Windows Not Working: Check the power window fuse (interior). Cigarette Lighter Not Working: Check the cigarette lighter fuse (interior). Car Won't Start (No Cranking): Check the main fuse (engine compartment) and the starter relay. Also, ensure the battery is fully charged. Alternator not Charging: Check the charging system fuse (engine compartment) Conclusion: Staying Powered Up in Your '96 Subaru By understanding your 1996 Subaru's fuse boxes and the functions of each fuse, you can confidently diagnose and resolve many common electrical problems. This guide provides the essential information to get you started. Remember to always prioritize safety, consult your owner's manual for specific details, and never hesitate to seek professional help if you're unsure about any electrical repairs. With a little knowledge and these handy diagrams, you can keep your classic Subaru running smoothly and save money by avoiding unnecessary trips to the mechanic. Happy motoring!
Lost Power In Your '96 Subaru? The Ultimate 1996 Subaru Fuse Diagram Guide (Avoid The Mechanic!)
```html Lost Power in Your '96 Subaru? Fuse Diagram Guide Lost Power in Your '96 Subaru? The ULTIMATE 1996 Subaru Fuse Diagram Guide (Avoid the...
