

Honda Hornet 600 Oil Capacity Secrets: Decoding the Black Gold and Keeping Your Hornet Buzzing!
So, you’ve got a Honda Hornet 600, that legendary middleweight streetfighter, renowned for its agile handling, punchy engine, and unmistakable wasp-like silhouette. You’re passionate about your bike, and you want to keep it running smooth, reliable, and ready to carve up the twisties for years to come. That’s fantastic! And a crucial part of that longevity is understanding the lifeblood of your engine: oil.
This article isn’t just about changing the oil; it’s about unlocking the Honda Hornet 600 Oil Capacity Secrets that even some mechanics might not readily share. We’re diving deep into the often-overlooked intricacies of oil levels, the potential pitfalls of getting it wrong, and why understanding these nuances is vital for the health and performance of your beloved Hornet.
Why is Oil Capacity So Important? The Engine’s Lifeblood.
Think of your Hornet’s engine as a complex, high-performance machine, a symphony of moving parts working in perfect harmony. These parts, from the pistons and crankshaft to the camshafts and valves, are constantly rubbing against each other at incredibly high speeds. Without lubrication, these surfaces would quickly wear down, leading to catastrophic engine failure.
This is where oil comes in. It acts as a crucial lubricant, reducing friction and wear. It also acts as a coolant, absorbing heat generated by the engine’s operation. Furthermore, oil cleans the engine, trapping contaminants like dirt, carbon deposits, and metal shavings, preventing them from causing damage. Finally, oil seals the gaps between moving parts, maintaining compression and ensuring efficient combustion.
The Oil Capacity Conundrum: Why It Matters and Why It’s Tricky.
Getting the oil capacity right is paramount. Too little oil, and your engine will suffer from insufficient lubrication, leading to accelerated wear, overheating, and potential seizure. Too much oil, and you can create excessive pressure, potentially damaging seals, causing oil leaks, and even hindering engine performance.
The “secrets” we’re talking about here often revolve around:
- The Official Specification: The manufacturer’s recommended oil capacity is a starting point, but it might not always tell the whole story.
- The Filter Factor: Changing the oil filter impacts the total oil required.
- The Importance of a Level Surface: Accurate oil level readings depend on a level bike.
- The “Dry Fill” vs. “Wet Fill” Debate: Understanding the difference can prevent overfilling.
- Real-World Variations: Factors like engine wear and riding style can influence optimal oil levels.
Background Context: The Honda Hornet 600 - A Legend in the Making.
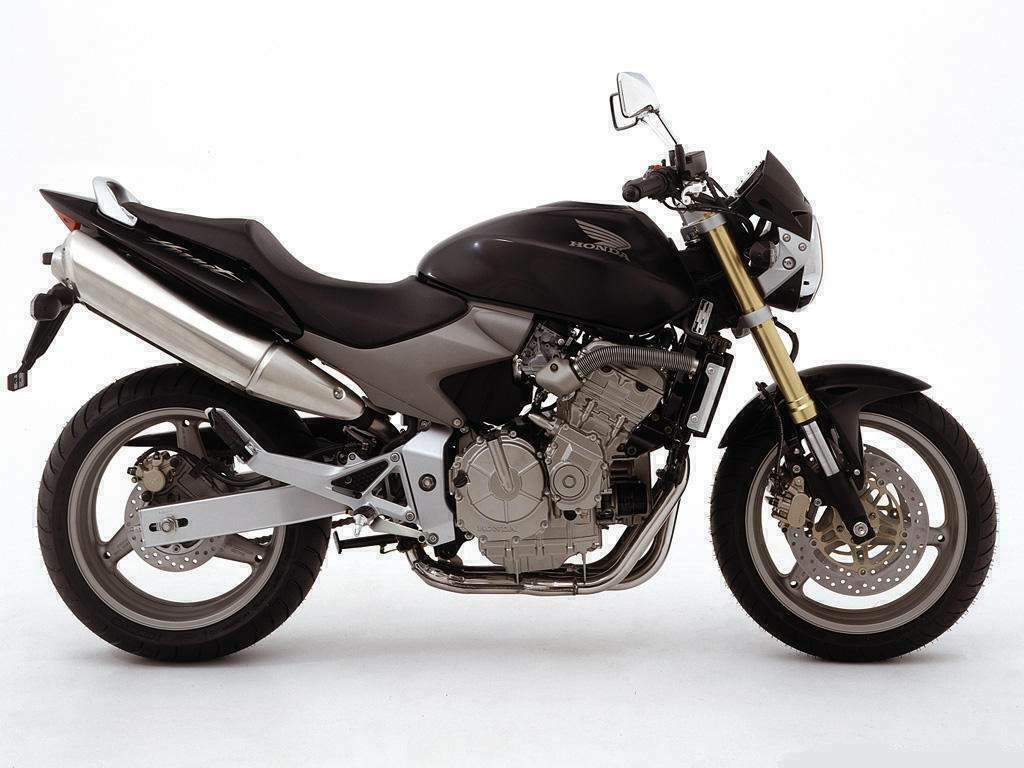
The Honda Hornet 600, also known as the CB600F, was a game-changer when it was introduced. Launched in 1998 (and evolving through various generations until around 2013, depending on the market), it quickly established itself as a favourite among riders of all skill levels. Its inline-four engine, derived from the CBR600F, offered a thrilling power delivery in a compact and nimble package.
The Hornet 600’s popularity stemmed from its versatility. It was equally at home commuting through city traffic, carving through mountain roads, or even tackling the occasional track day. This versatility meant the engine was subjected to a wide range of operating conditions, making proper maintenance, especially oil changes, even more critical.
This article will delve into the specifics of the Honda Hornet 600’s oil system, revealing the hidden details and providing you with the knowledge you need to keep your Hornet purring like a well-oiled machine. We’ll address the common questions, debunk the myths, and empower you to be the best possible caretaker of your beloved motorcycle. So, buckle up, grab your wrench (figuratively, for now!), and let’s dive into the fascinating world of Honda Hornet 600 oil capacity!
Honda Hornet 600 Oil Capacity Secrets: Decoding the Mechanics’ Silence
The Honda Hornet 600, a beloved middleweight motorcycle, is known for its responsive engine and nimble handling. Proper oil maintenance is crucial for keeping this machine running smoothly and reliably. However, the seemingly simple task of changing the oil can be surprisingly complex when you dig beneath the surface. This deep dive will uncover the “secrets” mechanics often gloss over, providing you with the knowledge to confidently perform your own oil changes and optimize your Hornet’s performance and longevity.
Why the Secrecy? (And Why You Need to Know)
Let’s be honest, mechanics often have their own interests at heart. Some might:
- Want to maintain a dependency: Oil changes are a recurring revenue stream. By keeping the details obscure, they encourage customers to rely on their services.
- Avoid explaining complexities: Explaining the nuances can be time-consuming. A quick “put in 3.5 liters” is often the easier route.
- Assume you won’t care: Many mechanics assume their customers are not interested in the technical specifics.
But you should care! Understanding the intricacies of your Hornet’s oil system allows you to:
- Ensure optimal engine protection: Correct oil levels and type are critical for preventing wear and tear.
- Save money: Performing your own oil changes significantly reduces maintenance costs.
- Develop a deeper understanding of your bike: This knowledge empowers you to diagnose potential issues and become a better rider.
- Gain confidence: Overcoming the perceived complexity builds confidence in your mechanical abilities.
Key Concepts: The Foundation of Understanding
Before delving into the specifics, let’s lay the groundwork:
- Oil’s Role: Engine oil is the lifeblood of your Hornet’s engine. It performs several crucial functions:
- Lubrication: Reduces friction between moving parts, preventing wear.
- Cooling: Absorbs heat and helps regulate engine temperature.
- Cleaning: Suspends contaminants (carbon, metal particles) and carries them to the oil filter.
- Sealing: Helps create a tight seal between pistons and cylinders, improving compression.
- Corrosion Protection: Shields metal surfaces from rust and corrosion.
- Oil Types: The Hornet 600 requires a motorcycle-specific oil. Key considerations:
- Viscosity: Indicated by numbers like 10W-40. The “W” stands for “Winter.” The first number (10 in 10W-40) is the oil’s viscosity at cold temperatures (winter), and the second number (40) is the viscosity at operating temperature. Consult your owner’s manual for the recommended viscosity for your climate. Using the wrong viscosity can lead to increased engine wear and reduced performance.
- API Rating: Indicates the oil’s performance level. Look for oils meeting or exceeding the API (American Petroleum Institute) rating specified in your manual (typically SG or higher).
- Oil Type (Mineral, Semi-Synthetic, Full Synthetic):
- Mineral Oil: The most basic type, often the most affordable. Suitable for less demanding applications and shorter change intervals.
- Semi-Synthetic: A blend of mineral and synthetic oils, offering improved performance and protection compared to mineral oil. A good balance of cost and performance.
- Full Synthetic: Provides the highest level of protection, performance, and longevity. More expensive but can extend the lifespan of your engine and allow for longer change intervals. The Hornet 600 generally benefits from synthetic or semi-synthetic oil.
- JASO MA/MA2: These ratings indicate that the oil is suitable for motorcycles with wet clutches. Using oil that doesn’t have this rating can cause clutch slippage.
- Oil Filter: Removes contaminants from the oil. Replace it with each oil change. Use a filter specifically designed for your Hornet 600.
- Oil Change Intervals: The frequency of oil changes depends on several factors:
- Oil Type: Synthetic oils typically allow for longer intervals than mineral oils.
- Riding Conditions: Severe conditions (stop-and-go traffic, track use, dusty environments) require more frequent changes.
- Your Owner’s Manual: Always consult your manual for the manufacturer’s recommendations, but be prepared to adjust them based on your riding habits.
The “Secret” of Oil Capacity: It’s Not Always a Simple Number
The owner’s manual and many mechanics will quote a specific oil capacity, typically around 3.5 liters. However, this is a starting point and often doesn’t tell the whole story. Here’s why:
- Complete vs. Partial Drains:
- Complete Drain: This involves draining the oil from the engine and the oil filter. This is the most thorough method and recommended for every oil change.
- Partial Drain: Draining only the oil from the engine, leaving oil in the filter. This is less effective and not recommended.
- The “Dry” vs. “Wet” Engine: The term “dry” refers to a completely empty engine, meaning it’s been rebuilt or the oil has been completely evacuated. A “wet” engine has residual oil in various parts. The Hornet 600 is almost always a “wet” engine during an oil change.
- “True” Capacity vs. Practical Capacity: The true capacity is the absolute maximum amount of oil the engine can hold. The practical capacity is the amount you’ll add during a typical oil change, taking into account residual oil.
- The Importance of Leveling: The bike must be level when checking the oil level. Use a level surface or a rear stand. A tilted bike will give an inaccurate reading.
The Step-by-Step Oil Change Process: Unveiling the Details
Here’s a detailed, step-by-step guide to performing a proper oil change on your Honda Hornet 600, incorporating the “secrets” and nuances:
- Preparation:
- Gather Supplies:
- New oil (meeting the specifications in your owner’s manual)
- New oil filter (correctly sized for your Hornet 600)
- Oil filter wrench
- Drain pan
- Wrench for the drain bolt (usually 17mm or 19mm)
- Torque wrench (highly recommended)
- Funnel
- Rags or paper towels
- Gloves (optional, but recommended)
- Shop towels or cleaning rags
- New crush washer for the drain bolt (highly recommended)
- Warm Up the Engine: Run the engine for a few minutes to warm the oil. This makes it flow more easily. Important: Do not overheat the engine! A few minutes at idle is sufficient.
- Safety First: Ensure the bike is stable (on a level surface or a rear stand) and the engine is off. Allow the engine to cool down slightly.
- Gather Supplies:
- Draining the Old Oil:
- Locate the Drain Bolt: The drain bolt is typically located on the underside of the engine, near the oil pan. Consult your owner’s manual if you’re unsure of its location.
- Position the Drain Pan: Place the drain pan directly under the drain bolt.
- Loosen the Drain Bolt: Use the correct wrench to carefully loosen and then remove the drain bolt. Be ready for the oil to flow out quickly! Note: The oil will be hot, so be careful!
- Remove the Oil Filter:
- Locate the Oil Filter: The oil filter is usually cylindrical and located near the engine (consult your owner’s manual).
- Loosen the Oil Filter: Use the oil filter wrench to loosen the oil filter. It may be tight, so be prepared for some effort.
- Remove the Oil Filter: Once loose, carefully unscrew and remove the oil filter. Be prepared for some oil to spill.
- Allow Complete Draining: Let the oil drain completely from both the engine and the oil filter. This can take 15-30 minutes. You can gently tip the bike slightly to help drain the last remnants.
- Installing the New Oil Filter and Drain Bolt:
- Prepare the New Oil Filter:
- Lubricate the Gasket: Lightly lubricate the rubber gasket on the new oil filter with fresh oil. This helps create a proper seal.
- Pre-fill the Filter (Optional): You can partially fill the new oil filter with fresh oil before installation. This helps prime the oil system faster on startup. Be careful not to spill oil during installation.
- Install the New Oil Filter: Screw the new oil filter onto the engine by hand until the gasket makes contact, then tighten it according to the manufacturer’s instructions (usually indicated on the filter itself, typically about 3/4 to 1 full turn after contact). Do not overtighten!
- Install the Drain Bolt:
- Inspect the Drain Bolt: Inspect the drain bolt and the engine’s threads for any damage.
- Install the New Crush Washer: If you’re using a new crush washer (highly recommended), install it onto the drain bolt.
- Tighten the Drain Bolt: Screw the drain bolt back into the engine and tighten it to the specified torque setting (check your owner’s manual). Using a torque wrench is crucial to avoid overtightening, which can damage the threads. If you don’t have a torque wrench, tighten it firmly but not excessively.
- Prepare the New Oil Filter:
- Adding the New Oil:
- Locate the Oil Fill Cap: The oil fill cap is typically located on the engine’s top or side.
- Remove the Oil Fill Cap: Unscrew and remove the oil fill cap.
- Add the Oil: Using a funnel, slowly pour the new oil into the engine. Start with less than the recommended amount (e.g., 3.0 liters).
- Check the Oil Level:
- Insert the Dipstick: Locate the oil dipstick. Wipe it clean with a rag or paper towel. Insert it fully into the engine and then remove it.
- Read the Oil Level: The dipstick will have markings indicating the minimum and maximum oil levels. The oil level should be within this range.
- Top Up (if needed): If the oil level is below the minimum, add small amounts of oil (e.g., 100ml at a time) until the level reaches the midpoint or the maximum mark. Do not overfill! Overfilling can damage the engine.
- Repeat the process: Reinsert, remove, and read the dipstick a few times, adding small amounts of oil as needed, until the level is correct.
- Start the Engine and Check for Leaks:
- Start the Engine: Start the engine and let it idle for a few minutes.
- Check for Leaks: Carefully inspect the oil filter and drain bolt area for any leaks.
- Shut Off the Engine: Turn off the engine.
- Final Oil Level Check:
- Wait a Few Minutes: Wait a few minutes for the oil to settle.
- Check the Oil Level Again: Repeat the dipstick check process, adding oil if necessary. It’s possible the oil level will have dropped slightly as the filter fills.
- Final Steps:
- Clean Up: Clean up any spills and dispose of the old oil properly (take it to a recycling center or auto parts store).
- Record the Oil Change: Keep a record of the oil change date, mileage, oil type, and filter type. This is helpful for future maintenance and resale.
- Ride and Monitor: Take the bike for a short ride and monitor the oil level and for any leaks.
The “Secrets” Revealed: Fine-Tuning Your Oil Change
Here are the key takeaways that mechanics sometimes omit:
- Don’t Just Dump in the Recommended Amount: The recommended capacity is a guideline, not a rigid rule. Always check the dipstick and add oil gradually.
- Factor in the Oil Filter: Remember that replacing the oil filter requires a slightly larger oil capacity.
- Consider the Engine’s Condition: Older engines may consume more oil. Regularly check the oil level and top up as needed.
- Listen to Your Engine: Pay attention to any unusual noises or performance issues after the oil change.
- Use a Torque Wrench: This is the most accurate way to tighten the drain bolt and oil filter, preventing leaks and damage.
- Don’t Overfill: Overfilling can cause excessive pressure and damage the engine.
- Monitor the Oil Level Regularly: Check the oil level every few rides, especially after an oil change.
Benefits of Mastering the Oil Change:
- Extended Engine Life: Proper oil maintenance is the single most important factor in extending the life of your Hornet 600’s engine.
- Improved Performance: Clean, fresh oil lubricates the engine more effectively, leading to smoother operation and improved power delivery.
- Reduced Running Costs: Performing your own oil changes eliminates labor costs.
- Peace of Mind: Knowing that your bike is properly maintained provides peace of mind and the confidence to ride it to its full potential.
- Enhanced Mechanical Skills: Performing your own oil changes is a great starting point for learning more about motorcycle maintenance.
Conclusion: Empower Yourself
Changing the oil on your Honda Hornet 600 is not rocket science. By understanding the “secrets” – the nuances of capacity, the importance of the oil filter, and the benefits of a thorough process – you can confidently perform this essential maintenance task. You’ll save money, gain knowledge, and ultimately, keep your Hornet running strong for years to come. Don’t be intimidated by the perceived complexity; embrace the learning process and enjoy the satisfaction of a job well done. Your Hornet will thank you for it!
Honda Hornet 600 Oil Capacity Secrets: FAQ - Mechanics Won’t Tell You This!
This FAQ is designed to address common questions and dispel misconceptions surrounding the oil capacity of your Honda Hornet 600. We’ll cover everything from changing your oil to understanding the nuances of the engine.
1. What is the official oil capacity for a Honda Hornet 600?
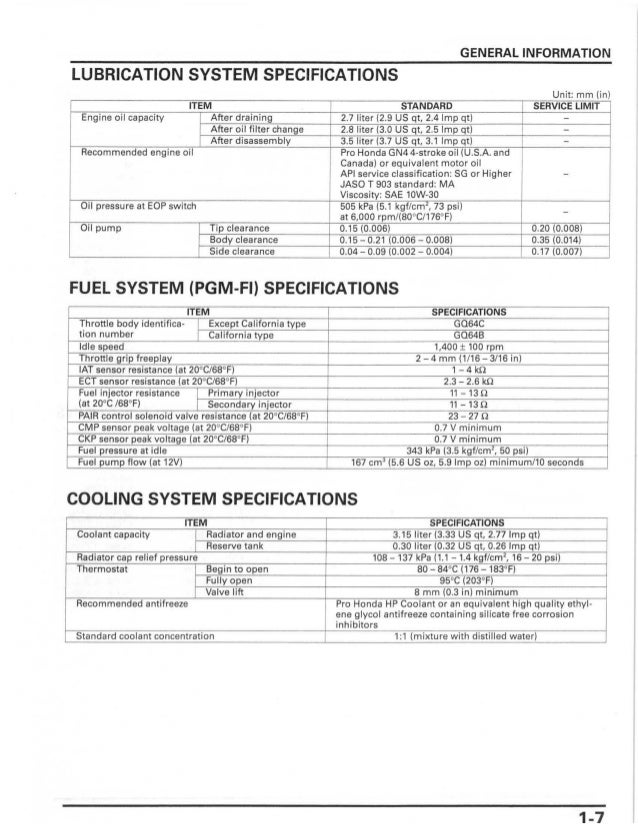
- Answer: The official oil capacity is typically around 2.7 liters (2.8 quarts) for an oil and filter change. This figure can vary slightly depending on the model year and whether you’re measuring at the sight glass or using a dipstick. Always consult your owner’s manual for the exact specifications for your specific year Hornet 600.
- Why it’s important: Overfilling or underfilling your oil can cause serious engine damage.
2. Why does the official capacity sometimes seem inaccurate? My bike takes more/less!
- Answer: This is a common issue, and several factors can contribute to this perceived discrepancy:
- Residual Oil: When draining the oil, some oil inevitably remains within the engine. The official capacity accounts for a complete drain, which is difficult to achieve in practice.
- Filter Type: The oil filter’s internal volume varies. A larger filter might require slightly more oil.
- Draining Method: Gravity draining versus using a vacuum pump can affect how much oil is extracted.
- Engine Temperature: Hot oil drains more completely than cold oil.
- Leveling: Ensuring your bike is perfectly level during oil changes is crucial for accurate measurement.
- Incorrect Measurement: Using the wrong measurement method (dipstick, sight glass, or both) or misinterpreting the markings can lead to errors.
- What to do: Start with the official capacity as a guideline, but always check the oil level using the sight glass (or dipstick, if equipped) AFTER filling and running the engine for a few minutes. Add oil gradually until the level is within the specified range.
3. How do I check the oil level on my Hornet 600?
- Answer:
- Sight Glass Method (most common):
- Level Surface: Place the bike on a level surface (not on the side stand).
- Engine Warm: Ideally, the engine should be warm (but not hot) after a short ride.
- Hold Upright: Keep the bike perfectly upright (you may need a friend or a bike stand).
- Locate the Sight Glass: The sight glass is usually located on the right side of the engine, near the bottom.
- Observe the Level: The oil level should be between the MIN and MAX markings on the sight glass.
- Dipstick Method (if equipped):
- Level Surface: Place the bike on a level surface.
- Engine Warm: Preferably after a short ride.
- Unscrew the Dipstick: Locate the dipstick (usually on the engine’s right side).
- Wipe Clean: Wipe the dipstick clean with a clean rag.
- Reinsert and Screw Back In: Reinsert the dipstick fully and screw it back in (if applicable).
- Remove and Check: Remove the dipstick again and check the oil level against the markings.
- Sight Glass Method (most common):
4. What kind of oil should I use for my Hornet 600?
- Answer: Consult your owner’s manual for the recommended oil type and viscosity. Generally, for the Honda Hornet 600, a 10W-40 or 10W-30 synthetic or semi-synthetic oil is suitable. Ensure the oil meets the API classification (e.g., API SL or higher) and JASO MA/MA2 specifications specifically designed for motorcycles with wet clutches.
- Why it matters: Using the wrong oil can lead to clutch slippage, premature engine wear, and even engine damage. Motorcycle-specific oils contain additives that are compatible with wet clutches.
5. Can I use car oil in my Hornet 600?
- Answer: Generally, NO. Do NOT use car oil unless it specifically states it’s suitable for motorcycles and wet clutches. Car oils often contain friction modifiers that can cause clutch slippage. Stick to motorcycle-specific oils.
6. How often should I change the oil on my Hornet 600?
- Answer: The recommended oil change interval varies depending on riding conditions and oil type. A good rule of thumb is:
- Standard Riding: Every 6,000-8,000 km (3,700-5,000 miles) or annually, whichever comes first.
- Severe Riding (track use, frequent short trips, dusty conditions): Every 3,000-5,000 km (1,800-3,100 miles) or annually, whichever comes first.
- Important: Always replace the oil filter with each oil change.
7. What happens if I overfill the oil?
- Answer: Overfilling can be detrimental. Excess oil can lead to:
- Increased Crankcase Pressure: This can force oil past seals, causing leaks.
- Aeration: The crankshaft can whip the oil into a foam, reducing its lubricating properties.
- Engine Damage: The oil pump may struggle to circulate the oil properly.
- Catalytic Converter Damage: Excess oil can be burned and damage the catalytic converter.
- What to do: Drain some oil immediately until the level is within the correct range.
8. What happens if I underfill the oil?
- Answer: Underfilling is equally bad. Insufficient oil can lead to:
- Increased Friction and Wear: Lack of lubrication causes increased friction between engine components.
- Overheating: Inadequate cooling due to insufficient oil flow.
- Engine Seizure: Severe cases can lead to catastrophic engine failure.
- What to do: Add oil immediately until the level is within the correct range.
9. Do I need to warm up the engine before checking the oil level?
- Answer: Ideally, yes. A warm engine allows the oil to circulate and settle, giving a more accurate reading. However, be careful not to burn yourself on hot components.
10. Should I use a specific oil filter brand?
- Answer: Not necessarily. Use a reputable brand that is specifically designed for motorcycles. Honda OEM (Original Equipment Manufacturer) filters are a safe bet, but other reputable brands like K&N, HiFloFiltro, or Mann-Filter are also excellent choices. Ensure the filter is the correct one for your specific year and model.
11. How do I know if I have an oil leak?
- Answer: Look for these signs:
- Oil Spots on the Ground: The most obvious sign.
- Reduced Oil Level: Regularly check the oil level and look for a drop over time.
- Oil Residue: Check the engine for oil residue, especially around seals, gaskets, and the oil filter.
- Blue Smoke from Exhaust: This can indicate oil burning in the combustion chamber (a more serious issue).
- Low Oil Pressure Warning Light (if equipped): This is a critical warning.
12. Is synthetic oil better than mineral oil for my Hornet 600?
- Answer: Generally, yes. Synthetic oils offer several advantages:
- Better High-Temperature Protection: Synthetic oils maintain their viscosity better at high temperatures.
- Improved Cold-Start Performance: They flow better at low temperatures, reducing wear during cold starts.
- Longer Drain Intervals: Synthetic oils can typically handle longer drain intervals.
- Better Engine Cleanliness: They tend to resist sludge and deposit formation.
- Considerations: Synthetic oils are usually more expensive. If your Hornet 600 is older and has a lot of miles, you can start using synthetic oil but it’s recommended to watch for oil leaks (as synthetic oils tend to clean up deposits that were previously sealing leaks).
13. What tools do I need to change the oil on my Hornet 600?
- Answer:
- Wrench or socket for the oil drain plug (check your manual for size).
- Wrench or socket for the oil filter (or oil filter wrench).
- Oil drain pan.
- Funnel.
- Clean rags.
- New oil filter.
- New crush washer for the drain plug (recommended).
- Torque wrench (recommended for proper drain plug tightening).
- Gloves.
- Bike stand (recommended for leveling the bike).
14. Can I reuse the crush washer on the drain plug?
- Answer: It’s not recommended. The crush washer is designed to seal the drain plug and prevent leaks. Reusing it can increase the risk of leaks. They are inexpensive and should be replaced with each oil change.
15. What is the recommended torque for the oil drain plug?
- Answer: Consult your owner’s manual for the specific torque specifications for your Hornet 600. Over-tightening can damage the threads in the oil pan, and under-tightening can lead to leaks. Using a torque wrench is highly recommended.
16. Why do mechanics sometimes recommend a different oil capacity than the manual?
- Answer: While this is rare, it could be due to:
- Their experience: Some mechanics might have experience with the engine and know that a slightly different amount works well in practice.
- Incomplete Draining: As mentioned, it’s difficult to drain all the oil.
- Using a different filter: A slightly larger filter might require a bit more oil.
- Misinterpretation: They might be using the sight glass/dipstick method and finding the engine needs more to reach the correct level.
17. I’ve heard about “oil flushing.” Is that necessary?
- Answer: Generally, oil flushing is NOT recommended for the Honda Hornet 600 unless there is a specific reason, such as severe engine sludge buildup or after a major engine repair. Flushing can sometimes dislodge deposits and send them through the engine, potentially causing more harm than good. Regular oil changes with good quality oil are usually sufficient to keep the engine clean.
18. How much should I expect to pay for an oil change on my Hornet 600?
- Answer: The cost will vary depending on where you live, the type of oil and filter you choose, and whether you do it yourself or have a mechanic do it.
- DIY: Expect to pay between $30-$75 for oil, filter, and crush washer.
- Mechanic: Expect to pay $75-$150, including labor.
19. What if my oil level is low, and I don’t have any oil on hand?
- Answer: DO NOT RIDE the bike if the oil level is critically low. You risk severe engine damage. If you must ride, add a small amount of oil (the same type you normally use) to get the level within the safe range. However, it’s best to transport the bike (e.g., on a truck) to a place where you can do a proper oil change or get it serviced.
20. Can I mix different brands of oil?
- Answer: It’s generally okay to mix different brands of oil, as long as they are of the same type (e.g., 10W-40, motorcycle-specific, synthetic). However, it’s best to stick with the same brand and type of oil for consistent performance.
21. I’ve been told I can “top off” the oil instead of changing it. Is that true?
- Answer: No, that is not a substitute for regular oil changes. Topping off the oil is only for maintaining the correct oil level between oil changes. Over time, the oil breaks down, loses its lubricating properties, and becomes contaminated with debris. You still need to change the oil and filter at the recommended intervals.
This FAQ provides a comprehensive overview of the Honda Hornet 600 oil capacity and related topics. Remember to always consult your owner’s manual for the most accurate and specific information for your motorcycle. Safe riding!
Honda Hornet 600 Oil Capacity Secrets: Conclusion & Summary
We’ve pulled back the curtain and revealed some of the often-overlooked secrets surrounding the Honda Hornet 600’s oil capacity. From the discrepancies between the owner’s manual and real-world experience to the crucial role of oil filters and proper measuring techniques, we’ve explored the nuances of this vital maintenance task that mechanics might not always readily share.
Summary of Key Points:
- The Manual Isn’t Always Right: The owner’s manual provides a general guideline, but the actual oil capacity can vary based on factors like oil filter type and engine configuration.
- The Filter Makes a Difference: Choosing the right oil filter (and ensuring it’s properly pre-filled) significantly impacts the total oil needed.
- Level is Key: Achieving the correct oil level is crucial for engine health and performance. Overfilling can be just as detrimental as underfilling.
- The “Hidden” Oil: Oil can get trapped within the engine, necessitating careful draining and a precise filling process.
- Observe & Adapt: Every Hornet 600 is slightly different. Paying attention to your bike’s specific needs and observing oil level behavior is paramount.
Final Thoughts:
Understanding your Honda Hornet 600’s oil requirements is not just about following instructions; it’s about becoming a more informed and responsible owner. By taking the time to understand these “secrets,” you’re proactively protecting your engine, enhancing its performance, and extending its lifespan. It’s an investment in your bike’s longevity and your own peace of mind. Don’t blindly trust everything you read – even in the manual! – always combine information with your own observation and experience.
Actionable Takeaways:
- Document Your Process: Keep a log of your oil changes, including the type of oil, filter used, and the amount of oil added. Note any changes in oil consumption or engine performance.
- Consult Experienced Owners: Connect with other Hornet 600 owners online or in local riding groups. Share your experiences and learn from their insights.
- Invest in Quality Tools: A reliable oil drain pan, a torque wrench, and a quality oil filter wrench are essential tools for this task.
- Check Your Oil Regularly: Make it a habit to check your oil level every few rides, especially after long trips or track days.
- Consider an Oil Analysis: For the truly meticulous, periodic oil analysis can provide valuable insights into your engine’s health and wear.
Next Steps:
Now that you’re armed with this knowledge, it’s time to put it into practice! Head out to your garage, grab your Hornet 600, and prepare for your next oil change. Use the insights you’ve gained to perform the job with confidence and precision. Your engine will thank you! Don’t forget to share your experiences and findings with the Hornet 600 community! Let’s keep the knowledge flowing and ensure these legendary bikes continue to roar for years to come.
